
Step 1: Install Laravel 10
If you don’t already have a Laravel project, create one:
composer create-project laravel/laravel laravel-email-demo
cd laravel-email-demo
Step 2: Configure Mail Settings in .env
Open your .env file and set your mail configuration.
Example with Mailtrap (for testing):
MAIL_MAILER=smtp
MAIL_HOST=smtp.mailtrap.io
MAIL_PORT=2525
MAIL_USERNAME=your_mailtrap_username
MAIL_PASSWORD=your_mailtrap_password
MAIL_ENCRYPTION=null
MAIL_FROM_ADDRESS=example@example.com
MAIL_FROM_NAME="${APP_NAME}"
Example with Gmail:
MAIL_MAILER=smtp
MAIL_HOST=smtp.gmail.com
MAIL_PORT=587
MAIL_USERNAME=your_gmail@gmail.com
MAIL_PASSWORD=your_gmail_app_password
MAIL_ENCRYPTION=tls
MAIL_FROM_ADDRESS=your_gmail@gmail.com
MAIL_FROM_NAME="${APP_NAME}"
Tip: If you're using Gmail, be sure to enable 2FA and generate an app-specific password.
Step 3: Create a Mailable Class
Run this Artisan command:
php artisan make:mail TestEmail
This creates a file at app/Mail/TestEmail.php. Open it and modify:
<?php

namespace App\Mail;

use Illuminate\Bus\Queueable;
use Illuminate\Mail\Mailable;
use Illuminate\Queue\SerializesModels;

class TestEmail extends Mailable
{
    use Queueable, SerializesModels;

    public $details;

    public function __construct($details)
    {
        $this->details = $details;
    }

    public function build()
    {
        return $this->subject('Test Email from Laravel')
                    ->view('emails.test');
    }
}
Step 4: Create the Email View
Create the file resources/views/emails/test.blade.php:
<!DOCTYPE html>
<html>
<head>
    <title>Laravel Email</title>
</head>
<body>
    <h1>{{ $details['title'] }}</h1>
    <p>{{ $details['body'] }}</p>
</body>
</html>
Step 5: Trigger the Email
Add this route to routes/web.php:
use Illuminate\Support\Facades\Mail;
use App\Mail\TestEmail;
Route::get('/send-email', function () {
$details = [
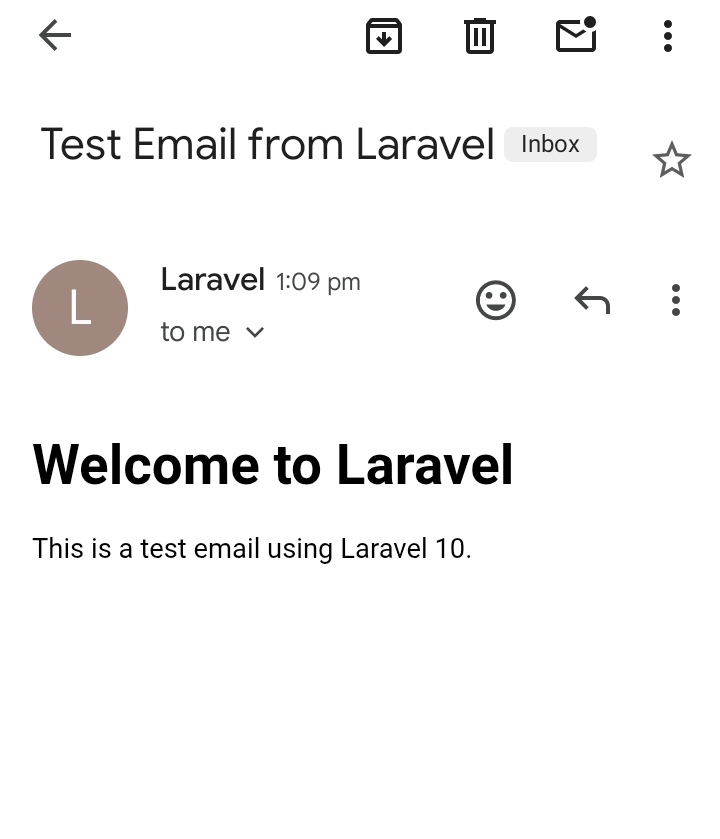
'title' => 'Welcome to Laravel!',
'body' => 'This is a test email using Laravel 10.'
];
Mail::to('receiver@example.com')->send(new TestEmail($details));
return "Email sent successfully!";
});
Step 6: Test Your Email
Start the Laravel development server:
php artisan serve
Visit this URL in your browser:
http://127.0.0.1:8000/send-email
You should see the message:
"Email sent successfully!"
And if everything is configured correctly, you’ll receive the test email in your inbox.
Final Thoughts
Laravel makes it easy to send beautiful, dynamic emails. You can go further with:
- Queueing emails for performance
- Markdown-based email templates
- Notifications system
Email Preview :

I'm a dedicated full-stack developer with expertise in building and managing dynamic web applications across both frontend and backend.
Yash Patel
Latest Blogs
Free Online Image Resizer – Resize Images Without Upload | EliteCodder
Dec 30, 2025
Laravel Joins Explained with Simple Examples (Inner, Left, Right & Full Join)
Dec 24, 2025
Build a Bird Game Using HTML, CSS & JavaScript – Complete Tutorial
Dec 23, 2025
Create REST API in Laravel Step-by-Step (Complete Guide)
Dec 22, 2025
Premium Website Hosting for 4 Years at Lowest Price | Hostinger
Jul 22, 2025
अहमदाबाद से माथेरान यात्रा गाइड – हिल स्टेशन की सुकूनभरी सैर
Jun 27, 2025


