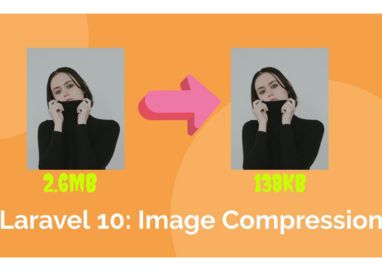
How to Compress and Optimize Images Dynamically in Laravel 10 Using Intervention Image
Uploading large images can slow down your web app, increase bandwidth usage, and affect user experience. That’s why compressing and optimizing images on the server side is crucial. In this tutorial, we’ll build a Laravel 10 application that compresses uploaded images to a target size dynamically using the popular Intervention Image library.
What You'll Learn
- How to set up Laravel 10 with Intervention Image
- How to create an image upload form with target size input
- How to compress images by adjusting quality and resizing dimensions
- How to save and preview compressed images in Laravel
Prerequisites
- Basic Laravel 10 knowledge
- Composer installed
- PHP GD or Imagick extension enabled (required by Intervention Image)
Step 1: Install Laravel 10 and Intervention Image
If you don’t have a Laravel project yet, create one:
composer create-project laravel/laravel laravel-image-compressor
cd laravel-image-compressor
Install Intervention Image:
composer require intervention/image:^2.7The package auto-registers the service provider and facade, so no manual config needed for Laravel 10.
Step 2: Set Up Routes
Open routes/web.php and add routes for showing the upload form and processing the compression:
use Illuminate\Support\Facades\Route;
use App\Http\Controllers\ImageController;

Route::get('/', [ImageController::class, 'showForm'])->name('upload.form');
Route::post('/upload', [ImageController::class, 'compress'])->name('upload.compress');
Step 3: Create the ImageController
Generate the controller:
php artisan make:controller ImageController
Replace the controller code with this:
<?php
namespace App\Http\Controllers;
use Illuminate\Http\Request;
use Intervention\Image\Facades\Image;
use Illuminate\Support\Facades\File;
class ImageController extends Controller
{
public function showForm()
{
return view('upload');
}
public function compress(Request $request)
{
$request->validate([
'image' => 'required|image',
'size' => 'required|numeric|min:1',
]);
$targetSizeKB = (int) $request->input('size');
$image = $request->file('image');
$filename = time() . '.jpg';
$finalPath = public_path('images/' . $filename);
$tempPath = public_path('images/temp_' . $filename);
// Load original image
$img = Image::make($image->getRealPath());
// Initialize parameters
$quality = 90;
$minQuality = 10;
$minWidth = 300; // minimum width limit
$width = $img->width();
$height = $img->height();
$compressedSizeKB = 0;
while (true) {
// Resize image maintaining aspect ratio
$resizedImg = $img->resize($width, $height, function ($constraint) {
$constraint->aspectRatio();
$constraint->upsize();
});
// Save temporarily with current quality
$resizedImg->encode('jpg', $quality)->save($tempPath);
clearstatcache(true, $tempPath);
$compressedSizeKB = filesize($tempPath) / 1024;
// Check if compressed size meets the target
if ($compressedSizeKB <= $targetSizeKB) {
File::move($tempPath, $finalPath);
break;
}
// Lower quality if possible
if ($quality > $minQuality) {
$quality -= 5;
continue;
}
// Reduce dimensions if quality minimum reached
if ($width > $minWidth) {
$width = intval($width * 0.9);
$height = intval($height * 0.9);
$quality = 90; // reset quality
continue;
}
// Can't compress more, save anyway
File::move($tempPath, $finalPath);
break;
}
session()->flash('success', 'Image compressed and saved!');
session()->flash('filename', $filename);
session()->flash('saved_size', round($compressedSizeKB, 2));
return redirect()->back();
}
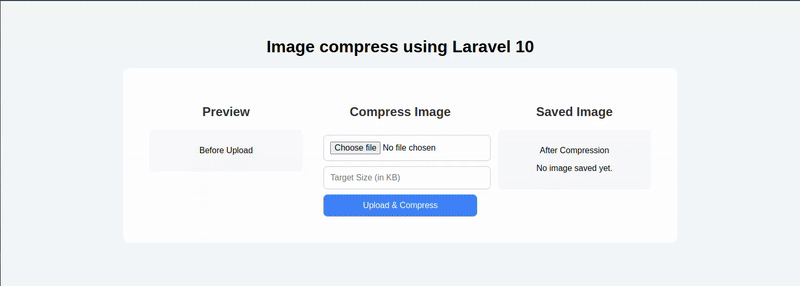
}Step 4: Create the Upload Form View
Create a Blade view resources/views/upload.blade.php and add this code:
<!DOCTYPE html>
<html lang="en">

<head>
    <meta charset="UTF-8">
    <title>Laravel Image Compressor</title>
    <style>
        /* Simple styling */
        body { font-family: 'Segoe UI', sans-serif; background-color: #f4f7fa; padding: 40px; }
        .wrapper { max-width: 1000px; margin: auto; background: #fff; border-radius: 12px; padding: 30px; display: flex; flex-wrap: wrap; }
        .column { flex: 1; min-width: 280px; padding: 20px; }
        h2 { text-align: center; color: #333; }
        .box { background: #f9f9f9; border-radius: 8px; padding: 15px; text-align: center; }
        img { max-width: 100%; border-radius: 8px; margin-top: 10px; }
        input, button { width: 100%; padding: 12px; margin-top: 10px; border-radius: 8px; border: 1px solid #ccc; font-size: 16px; }
        button { background-color: #3f83f8; color: white; border: none; cursor: pointer; }
        button:hover { background-color: #3168d2; }
        .alert { padding: 12px; background-color: #d4edda; color: #155724; margin-top: 15px; border-radius: 8px; text-align: center; }
    </style>
</head>

<body>

    <center><h1>Image compress using Laravel 10</h1></center>
    <div class="wrapper">
        <div class="column">
            <h2>Preview</h2>
            <div class="box">
                <p>Before Upload</p>
                <img id="preview" src="#" style="display:none;" alt="Preview">
                <p id="previewSize" style="display:none;"></p>
            </div>
        </div>

        <div class="column" style="text-align:center;">
            <h2>Compress Image</h2>
            <form action="{{ route('upload.compress') }}" method="POST" enctype="multipart/form-data">
                @csrf
                <input type="file" name="image" id="imageInput" accept="image/*" required>
                <input type="number" name="size" min="10" placeholder="Target Size (in KB)" required>
                <button type="submit">Upload & Compress</button>
            </form>

            @if (session('success'))
                <div class="alert">
                    {{ session('success') }}<br>
                    <strong>Filename:</strong> {{ session('filename') }}<br>
                    <strong>Size:</strong> {{ session('saved_size') }} KB
                </div>
            @endif
        </div>

        <div class="column">
            <h2>Saved Image</h2>
            <div class="box">
                <p>After Compression</p>
                @if(session('filename'))
                    <img src="{{ asset('images/' . session('filename')) }}" alt="Compressed Image">
                @else
                    <p>No image saved yet.</p>
                @endif
            </div>
        </div>
    </div>

    <script>
        const imageInput = document.getElementById('imageInput');
        const preview = document.getElementById('preview');
        const previewSize = document.getElementById('previewSize');

        imageInput.addEventListener('change', function () {
            const file = this.files[0];
            if (file) {
                const reader = new FileReader();
                reader.onload = function (e) {
                    preview.src = e.target.result;
                    preview.style.display = 'block';
                    previewSize.style.display = 'block';
                    previewSize.textContent = `Size: ${(file.size / 1024).toFixed(2)} KB`;
                };
                reader.readAsDataURL(file);
            } else {
                preview.style.display = 'none';
                previewSize.style.display = 'none';
            }
        });
    </script>

</body>

</html>
Step 5: Create the images Directory
Make sure you have a writable public/images folder where compressed images will be saved:
mkdir public/images
chmod -R 775 public/images
Step 6: Test Your Application
Run your Laravel server:
php artisan serve
Visit http://localhost:8000, upload an image, enter your target size in KB (e.g., 100), and submit. The image will be compressed dynamically and saved to public/images.
You’ll see:
- A preview of the original image and size before upload
- Confirmation after compression with filename and size
- Preview of the compressed image
How It Works: The Compression Algorithm
- Starts with the original image quality at 90%.
- Saves the image temporarily and checks the file size.
- If the size is still above the target, reduces quality by 5% increments down to a minimum of 10%.
- If reducing quality isn’t enough, reduces the image dimensions by 10% increments (never below 300px width).
- Saves the final compressed image once target size is met or limits are reached.
This dynamic loop helps balance between quality and size, ensuring images are optimized without drastic quality loss.
Conclusion
By combining Laravel 10 with the powerful Intervention Image library, you can easily compress images dynamically based on user input, improving site speed and user experience.
You can extend this project by:
- Supporting other image formats (PNG, WebP)
- Adding asynchronous upload with Laravel Queues
- Integrating image compression into APIs or admin dashboards

I'm a dedicated full-stack developer with expertise in building and managing dynamic web applications across both frontend and backend.